
Friday, December 25, 2009
Merry Christmas!
Wishing you and your family a wonderful holiday. We are celebrating in the only possible way we know fit: Going to the movies and out for Chinese food. It is a common Jewish tradition, and we almost always run into people we know.


Wednesday, December 23, 2009
Review: Australis Eyeshadow Trio Mystic Rose
Onward, next up from my Sasa haul, the Australis Eyeshadow Trio. Clocking in at $4.30 I honestly wasn't expecting much. Australis claims: "soft, smooth formulation gives a light, satin finish to eyes". Ok, well, how does this claim actually hold up?
Australis is an Australian brand, though this particular eyeshadow trio is made in Thailand (not sure if that's the case for all of their products). The back says they are "against animal testing" so I would assume that means they don't.
Mystic Rose is a trio of a pale ivory, a dusty mauve and a deep chocolate brown. Since it is closing in on 8pm EST these pictures were taken in pretty awful lighting, so I've done my best to accurately show the colors and swatches.

The palette comes in a fairly sturdy, yet minimalistic plastic container. There is a double sided sponge tip applicator which i won't be using (as always). Total weight of the product is 4 g so you're getting a little over a gram of product per color, which is actually pretty nice (for reference, MAC shadows are 1.5 grams each).


Australis is an Australian brand, though this particular eyeshadow trio is made in Thailand (not sure if that's the case for all of their products). The back says they are "against animal testing" so I would assume that means they don't.
Mystic Rose is a trio of a pale ivory, a dusty mauve and a deep chocolate brown. Since it is closing in on 8pm EST these pictures were taken in pretty awful lighting, so I've done my best to accurately show the colors and swatches.


I was seriously amazed when I swatched them (the ivory and brown especially). Silky smooth and pigmented to boot! These aren't chalky and are more like a satin finish (which actually confirms the claim the packaging said).


Here's all three colors together, although they are out of order; the ivory and the rose color should be switched.

l-r: rose, ivory, brown
I'm quite pleased with this purchase. This was one of two trios in stock when I ordered from Sasa. I'm definitely going to be on the lookout for others from this brand. Pretty neutrals, creamy texture and pigmented to boot!
Here is a badly taken picture of the back of the compact. Because the sticker on the back is shiny, it took me 6 or so tries to get a picture that worked and I'm pretty sure this one is fuzzy. Did my best!

Tuesday, December 22, 2009
Sephora Sale Sale
I'm sure many of you have read about the sale Sephora is doing tomorrow... well it actually started working today! Get 20% off all sale items with code EXTRA! Be quick. Most everything decent is sold out at this point.
In unrelated news, I worked 11 hours today (don't ask!) so I am very tired and hope this entry even makes sense.
In unrelated news, I worked 11 hours today (don't ask!) so I am very tired and hope this entry even makes sense.
Monday, December 21, 2009
Review: B&C Lip Cream (Tangerine)
Next up from my Sasa haul, B&C Lip Cream in Tangerine. This company used to be called Sony CP and was all over the makeup board a couple years ago I think. I knew that I had to haul one of these cuties for my Sasa haul. This retailed for $6.20 which is on the high side for a lipbalm but it is so darn cute I couldn't resist.
Ingredients:


Ingredients:

I think it's nice that there's actual tangerine extract in it. It does make the balm smell delightful. So, today during my impromptu day off (snow + cold = ice on the roads), I stopped by the crazy supermarket. I swear, everyone and their mother was out today replenishing their milk, bread and eggs after the blizzard and the parking lot was a disaster. Nevertheless, I stupidly continued to park and shop since we did need milk. I also bought clementines! And the tangerine lip cream bears a striking resemblance I must say! Look, can you tell which is which?

I'm sure you can and the sizes surely give it away. But, um, how adorable and true-to-life? Of course, with the fruit already in front of me, I couldn't help but, ya know, eat it.

Aha! Lipbalm on the right!

Come here, you sweet morsel of deliciousness!


*burp* Just kidding, a lady never belches... not! (I feel so 90s)

The lip cream is clear with a tiny orangey yellow tint which as you can guess doesn't show up on the lips. It is a potted balm which I'm not a huge fan of but it is so adorable and as you know, I love pretty/cute packaging. It's not what I'd call a "cream" either. It has a fair amount of slip and goes on nice, not too waxy, not too oily. It's not super moisturizing but not drying either (if that makes sense). Great smell if you like citrus and no offending taste. I can't tell if it tastes citrusy or if it's just the remains of my clementine.
Either way, adorable product. Glad I picked this one up.
Sunday, December 20, 2009
Review: Clio Art Shadow Duo in #10 ( khaki green)
Next up from my Sasa haul, the Clio eyeshadow duo. This was in the clearance section and significantly marked down to $5.50 USD (normally around $14 USD). Clio is a brand produced in Italy and sold nearly exclusively in Korea. Anyway, it's a baked product and we all know how much I love those.
I have to say, the packaging is divine. I love the artistic designs on the box and top of the eyeshadow. It's very unique (can you see the peeps in the background? Mmm Mmm Mmm).


Khaki Green is an eyeshadow duo with a pale green on top and a slightly darker green on the bottom. Both have quite a bit of shimmer to them. These are not what I would call pigmented shadows and really, I'd be keeping this for the packaging even if the shadows were crap. Isn't that kind of sad? I'm highly influenced by pretty packaging.

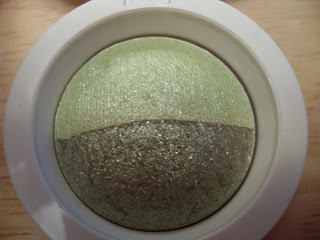
As you can probably tell already, the pigmentation sucks. The swatch of the bottom darker green looks like the top green in the pot. And the lighter green amounts to nothing more than a very very pale green shimmer when applied. Here are some finger swatches. Maybe this would give more color payoff with the included sponge applicator, maybe not.

I have to say, the packaging is divine. I love the artistic designs on the box and top of the eyeshadow. It's very unique (can you see the peeps in the background? Mmm Mmm Mmm).


The eyeshadow duo comes with a little sponge applicator that fits in the case similarly to Bourjois and there's a little plastic cover for the eyeshadow as well.


See? You can barely even see it on my finger. Oh well, it's pretty and I'm keeping it! And this, ladies and gentlemen, is the reason my stash is ridiculous.
Saturday, December 19, 2009
Review: Mentholatum Water Colour Bubbly Wine
First of all, I really appreciate all of you who have taken the time to do the little poll on here and I'm seeing just how possible more posts are. During the week, I really don't have a lot of time to post, as I'm well, working and commuting and soon school will start again. But I'll do my best!
Anyway, as I mentioned not too long ago, I was able to get some makeup from overseas for quite a good price. One of the items I bought is from a line called Mentholatum. I'm happy to report that the lipbalm I received isn't minty as I'm not usually a fan of that. Anyway, these lipbalms are super cheap. I picked up the tinted for $2.60!
I think the packaging is quite ingenious. Most of the time when you buy something that is in a cardboard blister pack container you invariably ruin all the writing and information on the back and sides trying to pop the darn product out. Not sure if you can see it in these pics, but Mentholatum has a little plastic tab that keeps the majority of the packaging in tact. Hooray!


When I opened it up, the product comes in a slant tube (which for colored products I prefer over a flat one).


Anyway, as I mentioned not too long ago, I was able to get some makeup from overseas for quite a good price. One of the items I bought is from a line called Mentholatum. I'm happy to report that the lipbalm I received isn't minty as I'm not usually a fan of that. Anyway, these lipbalms are super cheap. I picked up the tinted for $2.60!
I think the packaging is quite ingenious. Most of the time when you buy something that is in a cardboard blister pack container you invariably ruin all the writing and information on the back and sides trying to pop the darn product out. Not sure if you can see it in these pics, but Mentholatum has a little plastic tab that keeps the majority of the packaging in tact. Hooray!

Do you see it? Sorry for the yellowish nails. I've been cooking/baking today (there's probably some peanut butter up there).

When I opened it up, the product comes in a slant tube (which for colored products I prefer over a flat one).

I was a bit nervous initially because it looks rather pigmented and creamy and I did order a tinted lip product after all, but it is quite sheer. This swatch is probably 6 or 7 times rubbing it back and forth on my hand. I'd say it's a touch rosier than it looks since we're working with yellowish indoor lighting.

One swipe of this on the lips is a very very sheer rosey color. Texture is more on the slippery slide. Not what I'd call moisturizing but not drying either. Fruity smell in the tube, horrible plastic smell/taste on the lips unfortunately. It isn't very strong but it's bad enough for me to take notice. It reminds me of the philosophy kiss me lipbalm before they changed the flavor of it. Pity, since otherwise it's a nice product.
Tossed this.
Tossed this.
Sasa Haul
You might remember my post a few weeks ago asking what neat stuff at Sasa I should buy because of the paypal promo they did (buy $20+ of merchandise, get $20 back in your paypal account - only for certain account 'holders' unfortunately). Well I hemmed and hawed till a couple days before the promo was over and it took Sasa a little over a month to get the items to me, but it was well worth it!
I got:
Kuan Yuan Lian Beadlike Grain Powder*
Mentholatum Water Colour in Bubbly Wine (tinted lipbalm)*
Kaneba Prism Pearl Gloss*
Clio eyeshadow duo in greens*
B&C Mikan Chan Lip Cream in Tangerine (formerly Sony CP)*
Australis eyeshadow trio in mystic rose*
IsQueen hydro-shining lip treatment SPF 10*
& the free oreo-like cookie mirror
* = reviewed

I got a great deal and only paid about $29 USD for everything above and of course got the $20 rebate so basically only $9.
I'm really excited to try everything out. Today in MD we got somewhere between 15-24" of snow so I didn't wear makeup or even leave the house. I did however make peanut butter cookies and stew for dinner though. Yum!
I got:
Kuan Yuan Lian Beadlike Grain Powder*
Mentholatum Water Colour in Bubbly Wine (tinted lipbalm)*
Kaneba Prism Pearl Gloss*
Clio eyeshadow duo in greens*
B&C Mikan Chan Lip Cream in Tangerine (formerly Sony CP)*
Australis eyeshadow trio in mystic rose*
IsQueen hydro-shining lip treatment SPF 10*
& the free oreo-like cookie mirror
* = reviewed

I'm really excited to try everything out. Today in MD we got somewhere between 15-24" of snow so I didn't wear makeup or even leave the house. I did however make peanut butter cookies and stew for dinner though. Yum!
Friday, December 18, 2009
Aromaleigh Haul
Wow, that's some fast turn-around-time! I ordered December 13th. My order was shipped December 15th and I received the eyeshadows today, December 18th!
Everything is beautiful. An extra sample of a lip product was included in addition to the 3 free samples you get with every order (that you get to choose - so cool).
I went a little crazy, though I erred on the side of caution with the colors. The only super bright one I picked, Fanclub, a neon pink, I thought would make a nice cheek or lip color. Haven't really tested anything but the colors are gorgeous.


Everything is beautiful. An extra sample of a lip product was included in addition to the 3 free samples you get with every order (that you get to choose - so cool).
I went a little crazy, though I erred on the side of caution with the colors. The only super bright one I picked, Fanclub, a neon pink, I thought would make a nice cheek or lip color. Haven't really tested anything but the colors are gorgeous.


I think this might be downward spiral?

l-r: pleasuredome, shadowplay, fanclub

pleasuredome

fanclub

dirtydeeds

brown sugar
The other ones I'm not too sure about. They don't look a like, but they all have a bit of taupey goodness to them which makes it hard to figure out comparing the photographs to the actual jars.
I love the sifter and the fact that it has smaller holes than some of the ones I've dealt with (cough Bare Escentuals) so the product does not seem to spill out quite as freely making me not have to worry nearly as much about storing them upside down.
Can't wait to actually use them!
I paid $3.25 per jar, which is 50% off the regular price of $6.50.
Thursday, December 17, 2009
Aromaleigh
Aromaleigh has been having a countdown to Christmas sale in which they pick 1 collection and mark it down 50% for only 24 hours. Well, after reading this great account about the creator of Aromaleigh and seeing how very passionate about her products she is, I have been ordering lots of pretty colors 50% off. How could you not support someone like that?
If you haven't already checked out her blog, it's here and she announces the sales everyday with color swatches to boot! Even though I've never tried any of her products, I've heard great things about them and the color swatches make me very excited to get my goodies in the mail!
Have you tried Aromaleigh?
If you haven't already checked out her blog, it's here and she announces the sales everyday with color swatches to boot! Even though I've never tried any of her products, I've heard great things about them and the color swatches make me very excited to get my goodies in the mail!
Have you tried Aromaleigh?
Tuesday, December 15, 2009
How To: Blending Part I
So, one of the requests I got during my giveaway was a post on blending. Unfortunately, I haven't had the chance to play on a friend and thus a makeup model, so you get a cartoon eye on a piece of tissue.
Many many many people, bloggers, makeup artists and sales associates alike will tell you that tools (AKA brushes) are the key to any makeup look. I only marginally agree with them. I do not think you need a full set of brushes to make a good eye look. I think sometimes they help, but they are not always the key! Which is why you are going to look at me strange when I show you the next pic which only amounts to a very small percentage of my brush collection (what? They are pretty!).


So now that you have your brushes, I present to you Sassy Sally, our cartoon eye chick.

She says hello!
Now, I've drawn in a dotted line which is about where you blend your shadow. This isn't to say you should only blend shadow on the crease or on the lid or what-have-you, it's only so you can kind of see the steps involved.

So we are going to take the Sephora crease brush (not just for the crease!) and grab some shadow (in this case Giorgio Armani #44).


Many many many people, bloggers, makeup artists and sales associates alike will tell you that tools (AKA brushes) are the key to any makeup look. I only marginally agree with them. I do not think you need a full set of brushes to make a good eye look. I think sometimes they help, but they are not always the key! Which is why you are going to look at me strange when I show you the next pic which only amounts to a very small percentage of my brush collection (what? They are pretty!).

So, there are a lot of brushes in there. Brushes for face, eyes lips, cheeks and almost everything in between. If you bring everything down to basics, you need a total of 2 brushes to create a blended eye look.

Yes, there are 3 in this pic but you need 1 from column A and 1 from column B. The major difference between these brushes in the density of bristles. The brushes on the left are quite a bit more tightly packed which means they will deposit more color. The brush on the right is fluffy and will deposit less color. To blend colors you need a brush to pack on color (A) and a brush to blend (B). If you have a smaller eye or want to fill in a small space, the smaller of the two brushes on the left would probably be best (and I'd recommend the smaller ones to a beginner too).
For reference: beigey colored bristled brush is the Sephora Professional round crease eyeshadow brush, the next one over is the ELF eyeshadow C brush and the fluffy one is the Mark blending brush (fitly named).

Now, I've drawn in a dotted line which is about where you blend your shadow. This isn't to say you should only blend shadow on the crease or on the lid or what-have-you, it's only so you can kind of see the steps involved.


Taking the brush we are going to apply the shadow on the "lid" of Sassy Sally. Yes, it is supposed to be messy. No it doesn't matter. You'll be fixing it later.
Now, after you have applied your color, you now blend it. I tend to take the big fluffy brush and swipe it across my lid back and forth quite lightly like windshield wipers.

I usually do it right around the part that the color stops. And don't worry. You can't really mess this up. If you erase too much shadow, you can just reapply with the tightly-packed brush. If you are not combining two colors and are worried about it being streaky, apply some of your normal face powder on the brush to soften the line without adding color.
Now, there are some instances that you want to add color.

Here we have some Chantecaille eyeshadow (color unknown). Load up the fluffy brush (notice how this would generally be close to at least my skin tone. Unfortunately, Sassy Sally is even more of a sheet than I am (hahah).
Use the same sweeping motion with the fluffy brush.


See how the line is starting to erase (even though of course you can see it since it's dotted)?

Some winged liner and some mascara and Sassy Sally is ready to go out! She loves her soft blended look!
Now I know that's pretty much the basics. You can use various blocks of color and blend them the same way. Here's a small very quickly done diagram.

The idea is apply color in any shape you want, and around it (ie. squiggly lines) blend. As I said, you can blend it with just the brush, some loose powder or even another eyeshadow (though try to stick within the same color families or neutrals so it doesn't get muddy).
I hope this post was useful and I apologize again that I couldn't demo on a real person, but Sassy Sally is always willing to help. Achoo!
Also, you know how I disagree about tools? I painted the following with a Crayola paintbrush. The one that comes free in the water color palette. You know, the one that is like $3 that they sell to preschoolers? That one.

Comments? Questions? Tell me!
Subscribe to:
Posts (Atom)