Now that that's out of the way, I decided to break the 5 Minute Face into a series of posts regarding the different steps or products that you use: Foundation/Face, Blush/Cheeks, Eyeshadows/Eyes and Lip Products/Lips.
I'm doing Foundation/Face first not because it needs to be the first step in applying makeup though it is what I tend to do first in the mornings. I apply foundation first because I generally am not doing a detailed or dark eye look so I'm not likely to get a lot of fall out under my eyes. If you do get a lot of fall out or tend to use glittery or dark eyeshadows, you might want to apply your eye shadows first.
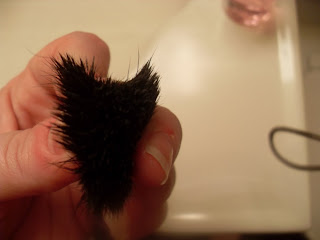
This is the brush that I use to apply my makeup in the mornings (this includes foundation and blush). What brush is this you ask? Beats me! I received this angled synthetic brush as an extra in a swap a while ago. I have used it everyday since and it's pretty much the same as the day I received it. Of course, there's been a bit of shedding, but it's retained the shape and has been super useful for me. Of course, this brush is "supposed" to be a "sculpt & blush" brush, but I use it for practically everything, including concealer.
What I like about this brush is that you can manipulate the bristles to do pretty much anything you want. For instance:
Use your finger to bend the bristles tightly together so you get a very opaque application - similar to what you'd get with a concealer brush. This also allows you to apply your foundation in nooks and crannies that you otherwise wouldn't be able to get to.Gather the brush tightly in your hands to mirror the kind of application you'd get with a flat-top brush or a skunk brush depending on the tightness of the bristles and your application style. Remember, the tighter the bristles are packed together, the heavier the application will be.
These are 3 items that I use everyday when I'm applying my makeup. First and foremost moisturizer, currently I'm using a Murad moisturizer but I generally rotate. Foundation, currently using Exuviance but really till I finish it to crack open another (click here to read about my foundation shades) and lastly Avene eau thermale mist. I use this generously after I apply foundation to give me some more moisture since my skin is super dry in the winter. I sometimes also spritz a little onto my brush to wet it a bit.
I actually have to thank Pixiwoo for giving me this great idea with my moisturizer. Prior to appying it directly to my brush, I used to apply it with my hands. Then I had to wash my hands. Then I had to wet my foundation brush with water which sometimes over soaked it. Anyway, this is brilliant and I'll never go back.
I squirt out a generous amount of moisturizer onto my brush and apply it in a sweeping motion on my face. Sometimes I am so dry that I have to apply moisturizer twice!
Then I squirt out a little dot of foundation and start applying it to my face. I start off with a few layers and the same sort of sweeping motion as I apply my moisturizer and I always built up the product on my face in very sheer layers. Too much, and my face will look super cakey.
I always apply foundation first before going back and concealing (which I usually do with my foundation - why not? It's a perfect match!). Why? Well, if you conceal first and then apply even more foundation on top, you might end up with cakiness right around your spots and who wants more attention there? Not me! The least amount of product will produce the most natural results.
As I showed you manipulating the brush, I can *stipple the foundation on, apply it in a sweeping motion or use it to spot conceal just by shaping it with my fingers.
need coverage around your nose? No problem!
And of course we all get blemishes. I generally stipple the foundation on top using a patting motion with my brush. I gather the bristles tightly together to apply the most product so I get the most coverage. And pat the product on.
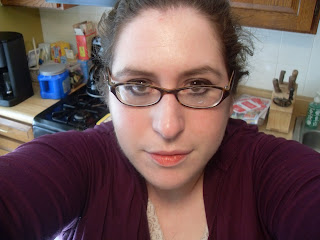
To get even more coverage, I sometimes spot conceal with my finger using the same sort of patting motion as the brush. After I'm done applying foundation, I give myself a very generous spirtz of the Avene mitz. I was not blessed with good skin and I use this technique to make it seem like my skin was perfect prior to the makeup. Here's a picture of my skin after foundation/concealing.So there you go. Any questions? I hope this was helpful. Just for reference, most of these pictures were taking in the bathroom where the mirror assisted me in taking pictures applying the makeup. I think the lighting is quite yellow-ish in there and of course it isn't natural light! The last picture was taken in our kitchen with more artificial light, but I don't think it's quite as yellow as the bathroom.
*A side note about stippling. Many makeup artists, gurus and bloggers alike will tell you that they stipple their foundation. Curiously enough, the true origins of stippling have nothing to do with flawlessly blending a color into your skin. Slightly similar to pointillism. Personally, I'm not looking to make my face look like a Van Gogh when I apply makeup. Maybe it's just me! Also a note that I usually don't consider wiki a decent reference source (and my librarian husband may be mad at me for citing them but they explain it pretty well so there you go).


3 comments:
Hahaha! Your "any questions?" makes me think of teachers and professors, I giggled just a little. :)
But no questions! & thanks for the tips and insights! ^___^
Wow, this is so awesome!! I can't wait to try this tomorrow XD
@sunniipinky: Glad, I'm at least entertaining. =)
@Lisa Kate: Aw, you're sweet. =)
Post a Comment